Thursday, June 12, 2014

Move Documents from one Google Account to Another

Our district is implementing Google Apps for Education, and today I trained several teachers on using Drive. Some of the teachers had already been using personal Google accounts to create documents and collaborate with their teams, and they wanted to know how to move those files from the personal Google accounts to their new school accounts.

You can't simply move the documents or files, but you can transfer the ownership of most files from account to the other. Simply follow these steps:


  1. Log into your personal Google account at drive.google.com.

  2. Check the box next to the item you want to add to your new account.

  3. Click the Share icon OR go to the More menu and select "Share..." 

  4. Add the email address of the new account in the field for "Invite people," then click Share & save. (If you have already shared the document with your new account, you can skip this step.)

  5. You should now see the new account listed in the shared settings. Click the drop-down menu to the right of the name and choose "Is owner."
    Change owner

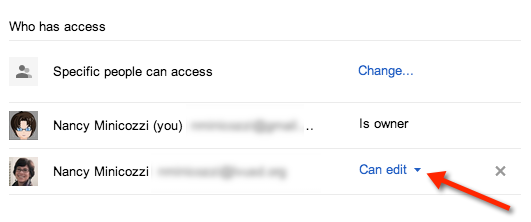
  6. Save your changes. Your new account is now the owner of the document, and the original account is an editor.

  7. (Optional) If you want to remove the document completely from the original account, log into your new account, go to the sharing settings for the document, and stop sharing with your original account.

If you have a regular Gmail account, be aware that you can't change the ownership of some files, such as images and PDFs. To move these files, follow these steps:

  1. Proceed as above and follow steps 1-4 to share the item with the new account.

  2. Log into the new account and located the item in the "Shared with Me" section.

  3. Click the box next to it and choose File > Make a copy.

  4. Choose the name you want for the copy.

This will create a copy of the item in your new account. If you want, you can go back to your original account and delete the item there. Remember that if you make a copy of a file, it will not be shared with the same people as the original. If there are files whose ownership cannot be transferred, but you want to work with them in a different account from the one where they were originally uploaded, it may be easier just to share them with the new account and leave the original file where it was.

This post cross-posted on CoffeeNancy.com.

Friday, April 11, 2014

A picture is worth 1,000 words: Google Drawing

If you have already made the switch to Google Apps, you have probably been experimenting with the Big 3: Docs, Spreadsheets, and Presentations. These are all great tools that support creativity, critical thinking, communication, and collaboration, but have you ever taken a look at Google Drawing? It's one of the best tools you probably never knew you had. Hidden away from view, it is easily accessed with one click of the Create button in your Google Drive.

Google Drive create button

Working with Google Drawing is easy. You can add shapes (hold down the shift key for perfect circles or squares), arrows, lines, text boxes, and tables. Images can be uploaded from your computer, added via snapshot, or linked from the web. If you need to search for an image, Google Drawing has you covered. Just click Insert > Image, choose Search and you can select from copyright-friendly image results from Google Search, the LIFE Photo Archive, or stock images (these have some restrictions when used outside of Google Drive, so proceed with caution).

Once you have created your drawing, there are many ways you can use it in your classroom. For example, you can make seating charts or create content to use with students, such as KWL charts, math drawings, or virtual manipulatives. Even better, have your students use it to make any number of products, such as word webs, timelines, comic strips, or graphic organizers. In fact, there are so many ways to use Google Drawing, we have added a new page to the LVUSD Teaching with Google Apps website. Want to learn more? Visit the Google Drawing page.

Friday, February 21, 2014

Caption that!

We all know that video captions can increase accessibility for English learners and students with hearing difficulties or learning disabilities, but were you aware that captions increase comprehension for all students? If you are making and sharing your own YouTube videos, you should consider taking just a few extra minutes to add captions. It's easy and it will enhance learning for your students. Here's how:

  1. Log in to YouTube.

  2. Click on the icon in the upper right to see the YouTube and Google Account menu links. Click on Video Manager.
    Video Manager screenshot

  3. Click the dropdown menu next to the Edit button for the video you would like to caption. Select Captions.
    Captions screenshot

  4. At this point, you may see that your video already has automatic captions generated by YouTube's speech recognition technology. You can either edit these or upload a completely new caption file. Follow the appropriate steps below.


To edit existing captions (either automatic or captions you have uploaded previously):

  1. Click on the caption track. The caption track panel will open.
    Caption track screenshot

  2. Click inside the caption track panel and edit the text.

  3. Scroll to the bottom and Save or Save a copy (for automatic captions).
    Caption track screenshot


If you want to add new captions, you have two options. You can either type them up first and use them as a script while recording your video (usually my preferred method since I like to have a script anyway) or you can record your video, then listen to it and type up what you said.

To add new captions from a file:

  1. Make sure you have saved your file as a .txt file. On a Mac, you may wish to create the file in TextEdit. On a PC, you would use Notepad.

  2. Click the large blue Add captions button. Select Upload a file.
    Upload screenshot


  3. Set your track language. If you choose to add a track name, it will be displayed when viewers click the cc button below your video; otherwise the track language name (English) will be shown.


  4. Click Upload, browse to the file with your captions, and click Open. The text will be automatically synced with your video.
    Upload file screenshot


To add new captions by typing up what you said after you have recorded the video:

  1. Click the large blue Add captions button. Select Transcribe and sync.
    Transcribe screenshot

  2. Set your track language. If you choose to add a track name, it will be displayed when viewers click the cc button below your video; otherwise the track language name (English) will be shown.

  3. When you have finished, click Sync.


I strongly encourage you to try adding captions to your videos. It won't take you long and your students will thank you for it (and even they don't say anything, they will still be thankful).


If you'd like to read more about the benefits of video captions for students, you may want to take a look at these articles:

Tech note: Screenshots for this post were created using Skitch. I chose this application because it creates text with a background shadow that makes it easier to read when the image is small, as it is here.

Wednesday, February 19, 2014

New tools for old projects!

Looking for to jazz up that same old project?  Feel like you have been doing the same thing year in and out!  Here are two ways to integrate multiple content areas while building creativity and incorporating technology. For the sake of this post we are going to use the 4th grade Mission project as our lesson that needs a new twist.  Instead of having students create a model of their Mission using tools like cardboard, pretzels and twigs let them create a 3D model using an app.  Sketchup is a free 3D modeling app by Google.  It is intuitive, easy to learn and fun!  Google offers great training videos that students can access on their own while creating their design. Another great modelling app is MineCraftEdu.  You have probably heard of it, as MineCraft it is very popular with students. What you might not have known is that there is a version of the app for educational usage. The education version has a custom mode, which is a customized modification of the game, that allows teachers to make the game more effective and focused. There are also many how to videos available on YouTube for this game but chances are your students already know how to use this one.  There are also great resources for teachers starting with MineCraft Teacher blog that offers a list of other resources or the MineCraftEdu site. Check out these final products!

Sketchup example:


MineCraftEdu Example:


Of course these apps can be adapted for many other uses, I am sure you can think of one right now! The added benefit is that when using either of these tools kids are using math skills like proportion and scale.  They also will need to understand and properly use the X, Y and Z axis.  They will be introduced to building and architecture materials and terms, all while playing a game for homework.


Monday, February 10, 2014

Weblock Ad Blocker for iOS

Wouldn't it be great if you could let your students browse websites on iPads and iPhones without having to worry they will be distracted by or accidentally click on advertisements? Weblock - AdBlock for iOS is an app that you can install to block ads on iPads, iPhones, or iPods, and it will work no matter what browser or application your students have open. You can use the predefined lists they set up or you can create your own rules to allow or block any website, page, or domain. There is a little bit of set up required, but the app provides good instructions. If you are interested in downloading this app, you will want to act soon. It normally costs $1.99, but it is free for a limited time. Get it while you can!


WeBlock logo

Friday, February 7, 2014

Word Cloud Generators

If you have ever used Wordle, you know what a word cloud is.  Also called a tag cloud, word clouds are visual representations of word frequency. Word cloud generators work by analyzing text and counting the number of times each word has been used. They then create an image in which the more frequently used words are larger. This allows students to see at a glance which words are the most repeated in the document. Word clouds are wonderful tools for helping students identify main ideas and key topics in a passage. They allow for student creativity in a way that just listing ideas in a graphic organizer does not. Here are a few of my favorite word cloud generators for you to explore. I also recommend that you take a look at slideshare user Gemma Holtam's presentation, 50 Interesting Ways to Use Wordle in the Classroom. Her suggestions are applicable to any of the word cloud generators below.

Tagul (http://www.tagul.com) allows for many types of customizations (layout shape, fonts, colors, etc.). What makes it really stand out is that if you embed your created image, when you roll over a tag, it animates and can be clicked to a Google search for that term (the default behavior) or to any other website you have assigned. The service is free, but requires registration with a valid email address to use, which may limit some classroom applications. Text may be added by typing in the box or copying and pasting, but can also be uploaded from a spreadsheet or pulled from any website you desire. The commonly used word filter can be customized to remove the basic set of words or just those you want it to remove. Below is an example of the text from the Declaration of Independence; be sure to hover over the tags to see how they move.


ABCYa Word Clouds for Kids (http://www.abcya.com/word_clouds.htm) works just like Wordle, but doesn't run on Java, so it runs on all popular browsers. It is easy for young students to use, since it offers enough color and font options to make them happy, but not so many that they are overwhelmed. Text can be added only by typing directly in the box or by copying and pasting; there is a filter (on by default, but you can turn it off) to remove the most common English words. The generated word clouds can be saved to your computer or printed easily. The image below was created using text from an information page for elementary students.

ABCYa word cloud for kids

Tagxedo (www.tagxedo.com) works similarly to Tagul, but doesn't require a login. There are many choices of shapes, and you can upload your own as well, although it is not as easy to do as it is in Tagul. Text can be added by typing in the box or by copying and pasting. You are also supposed to be able to add text from a URL as well, but I have not been able to do so.  Saving and printing your image is easy. This site could be a good solution for many who liked Wordle but are now finding that it no longer works for them and don't want to use a site where logins are needed.
Tagxedo of Abraham Lincoln


Word Sift (http://www.wordsift.com) is a website maintained by Stanford University ELL Resources, but it is wonderful for all students. It works a little differently than the other word cloud generators, as it identifies the 50 most common words in the text you enter and only incorporates those into the cloud. They appear in alphabetical order, but can be easily sorted in various other ways with the click of a button. The most frequent word is entered into the Visual Thesaurus below the cloud and the resulting word web is shown. The results page also includes sample sentences and images from Google searches of the most frequent words. If you are interested in learning more about this excellent product, I recommend that you visit the site and watch this video explaining how it works (4:42 minutes).

Monday, February 3, 2014

Pause and Think Online

To help kick-off the elementary CyberSmart Week here is a great video you can share with your class!